Producing a podcast the geeky way: Audio
Nov 11, 2018
A few months ago I started my podcast Corded where I talk to people whose jobs or creations I find interesting. Corded is an ongoing learning experience not only in the sense of producing interesting material, but also the technical intricacies that come with producing an audio/video product.
This article, the first of a three-part series, aims to shed some light on the geeky way I produce my podcast.
Note that I could not emphasize geeky enough: as it often is, when I take up a creative activity, I find the technical side of it just as interesting as the creative side, if not more so. Perhaps this is why when I dabbled in streaming on Twitch, I found that I enjoyed spending hours in OBS trying to make the scene just perfect at least as much as I enjoyed the actual streaming. I will often choose the long route instead of the easy one, just to learn more about the inner workings, rather than make my process as easy as possible. My process will not be the optimal one for everyone or possibly even anyone other than me.
The topic of this first article is audio, the most instrumental part of any podcast.
Hardware
Way before I actually started recording episodes, I became a fan of Bandrew Scott's YouTube channel called Podcastage. Bandrew is constantly putting out in-depth reviews of microphones, audio interfaces and other audio hardware.
It was in part Podcastage that helped me decide on what is so far the only piece of "audio hardware" I use: the Samson Q2U dynamic microphone. Nothing in its price range can beat Q2U's versatility: it can be connected via USB for that no-frills plug-and-play experience, however, an XLR port is also included which makes for a clear upgrade path if one ever decides to upgrade to a standalone audio interface or finds themselves in need of a mixer for live production.
Other than that, I also got a cheapo Neewer boom arm with an included pop filter. It is worthy to note that I had to go to a local store to get a suitable mic clip for the Q2U, as the shock mount with the arm was too large: likely manufactured to accomodate larger condenser microphones.
Remote recording woes
Once I got my gear sorted out, it was time to figure out how best to record both me and the guests. For now, I have opted for remote interviews. This means that I do not have to get more microphones for my guests or even invite them over (possibly meaning a trip from another city just to record for 30 minutes). However, it slightly complicates the process on my side: not only do I need a VoIP solution to communicate, I also need a way to record both my own end and the other end.
For the first issue, I have used both Discord and Zencastr so far. Considering most of my guests do not own a studio-quality microphone in the first place, these applications provide a good-enough quality. I found Zencastr to be less of a hassle as the guests would not need to create a Discord account and configure its audio settings for optimal recording.
Both Zencastr and Discord (using Craig) can record each participant's track separately. However, upon testing Zencastr, I noticed it would often suffer from audio drift issues. For one reason or another, I decided not to try Craig and instead searched for software I could run solely on my own machine and which would let me record both my microphone in and the loopback interface (i.e. 'what you hear') simultaneously. This way, Discord or Zencastr would be used purely as a way to communicate, without using their recording capabilities.
This was not a trivial task, as most digital audio workstations (DAWs) will expect you to use a single audio interface when in my case there were two: the on-board sound card which I would plug my headphones into and the Samson Q2U which acts as a sound card of its own when used via USB.
Finally, I decided on a solution: OBS. Yes, that OBS, mostly used by streamers on Twitch or YouTube. Usually streamers will want the audio on their stream to contain both the loopback interface (e.g. game sounds) and their own microphone. OBS allows to record a setup like that out-of-the-box, and if you tune the settings just right, it will put your audio sources into separate audio tracks in the resulting video file. I would then use Avidemux to extract these separate tracks from the video file. It was the perfect hack, which I gladly used for recording the first three episodes.
Post-production and perfectionism
Of course, just because you have the recording does not mean it is ready for your listeners' ears. Any podcast warrants at least basic post-production: background noise removal, cutting out any mess-ups or awkward silence. Most podcasters will also use an equalizer at least minimally (cutting off anything below 80 or 100 Hz is a usual practice) and apply compression to not have startling changes in audio levels.
Initially I went for the trusty Audacity which I had been using for years whenever I needed to do basic audio edits. For beginner podcasters, using Audacity is a no-brainer. It's free, its noise reduction works like magic, and, once I learned the keybindings, making cuts in the episode felt like swinging a sharp samurai sword at the tracks.
Post-production was (and still is) the most time-consuming part of my process. Even after making the initial cut I would listen to the entire episode 5 to 10 more times, finding something worth fixing every time, be it a sharp breath of the guest, or me going on a tangent that I would find not worthy keeping in.
After all this was done, the episode would be exported to an MP3 file. Many podcasters will tell you that a 64 or 96 kbps mono export is enough. I went a bit overboard and chose 128 kbps as my baseline, with the one exception being episode 2, which included a preview of a track from Kuoga.: that one, I felt, warranted a 256 kbps stereo export.
The move to Linux and a DAW
I have been using Linux as my main OS for about 10 years now (with a 2 year period of being an OS X guy). Windows exists on my hard drive mostly to run a few games that do not perform as well on Linux. So naturally, I wanted to move my podcast production to my preferred OS as well.
As an additional step towards greatness, I decided to look for a proper DAW. Not only is Audacity's multi-track recording limited, it is also a destructive editor. That means that whatever FX or edits you apply to a track in Audacity, it is like painting over something in MS Paint. Sure, you can click "Undo" a few times, but what if you save the project and reopen it? Or if you want to undo an earlier change without affecting the later ones? Want to bypass one of the 10 effects you applied? Tough luck.
Non-destructive editors treat changes more like Adobe Photoshop treats layers. You are free to turn effects on or off or make cuts and then bring the removed parts back without affecting anything else. Besides, everything is applied in real-time as opposed to Audacity that will present you with a progress bar while the waveform changes before your eyes.
In search of a more professional piece of software, I first tried using Ardour, probably the most significant open source DAW. And while I liked its vast recording and routing capabilities, I quickly found that the set of plugins Ardour comes with is very spartan (perhaps on purpose). Scavenging the interwebs for a decent noise removal plugin felt like a backwards step from Audacity, so I quickly turned my attention elsewhere in pursuit of an all-in-one solution.
In the end, I decided on REAPER, a DAW often recommended in the r/podcasting community. The team behind REAPER had just recently started publishing native Linux builds at the time. Despite not being as prevalent as FL Studio or Ableton Live, REAPER is by all means a professional DAW. Just like Ardour, it comes with flexible audio routing, but surpasses it in plugins in terms of both quality and quantity. The bigger userbase also helps: YouTube is full of tutorials for doing all sorts of things using REAPER.
The caveat? REAPER is non-free. However, the WinRAR-like nagware model is a welcome practice. REAPER does not limit functionality even if you use it past the 60-day trial period. Hell, they even offer a set of plugins which you are free to use in any other DAW of your liking. Even if I find the $60 personal/small-business license steep, that is only because I record about one episode per month. Compared to prices of other DAWs of similar level, it is essentially pennies. Pennies that I will pay some time in the future, I promise.
Apart from editing non-destructively, my post-production barely changed with the move from Audacity to REAPER: I still use the same functionality (noise removal, equalization, compression), I still make similar cuts in the episode, and I still export in the same quality.
JACK: the daemon of my nightmares dreams
Another key component to working with audio on Linux is JACK: the "professional sound server daemon". I have been aware of JACK for a while now, perhaps back from all the times I tried to make my PC into a guitar amp using Rakkarack (which, of course, used JACK).
I might have lacked patience back then, because I struggled with just getting JACK up and running a lot. Now, however, I found the experience involved, yet relatively painless. I did need to spend some time learning how to use the audio routing and get JACK to play along nicely with PulseAudio (which is in turn another daemon that most "consumer" Linux software like Firefox or Discord use for audio).
A few evenings learning the ins and outs of JACK yielded this recording setup:
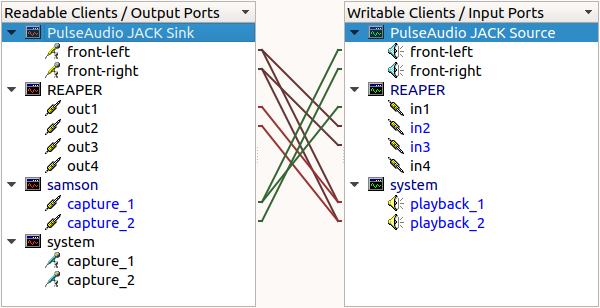
While this may seem convoluted to an untrained eye, it is actually a quite elegant setup:
samson, my microphone (attached via alsa_in), feeds into bothREAPERto record andPulseAudio JACK Sourcefor my VoIP solution to transmit.PulseAudio JACK Sink, i.e. 'what I hear' from the guest via Zencastr via Firefox goes to two destinations as well:REAPERand my headphones.REAPERoutputs tosystemby default. I do not use monitoring from the DAW when recording.
While this setup is pretty simple, JACK, in conjunction with a DAW like REAPER, provides almost infinite audio routing possibilities. For example, if I ever wanted to do live podcast production, it should be possible to do a mix-minus solely by making the right connections in the software, without any need to shell out money for a hardware mixer.
For more info about using JACK for podcasting check out this video by Dustin Williams, who uses an even geekier JACK setup using jack_mixer, jack_capture, and some helper shell scripts.
The future
As it stands now, I am happy with my Q2U/JACK/REAPER setup for recording and post-production. Aside from getting better at actually using REAPER, the best improvement to make would probably be moving to an in-person recording setup, including a standalone audio interface, a couple more microphones and a dedicated sound-treated space in my home or elsewhere.
However, like I've mentioned before, that change would come with its own set of drawbacks and my low episode output makes it hard to justify the time and money investment it would require.
The next part of the series will focus on the video part of my podcast: the why and the how. If you're able to decipher Lithuanian and like podcasts, consider subscribing to Corded. :)